Showing posts with label affordable. Show all posts

Wednesday, December 23, 2009

Holiday DIY: Pie of Roses


Yesterday we talked about some great ways you can decorate your home last minute. However, if you have some extra time on your hands and want to make something special I have a beautiful DIY for you to try. It’s blissfully simple, but something you’ll have to make the day of or the day before you plan to use it since flowers are so fragile. This makes a great statement piece on your holiday table.


Materials:
Directions:
1) Prepare oasis floral foam to fit snugly into the pie plate. Make sure the top of the foam is flush with the edge of the plate.

2) Cut stems of roses so that you have just enough to stick into the foam. I’m approximating 2 inches, but it could vary depending on the depth of your pie plate. Place roses artfully all around the foam to fill the pie plate.

3) Take your ribbon and form a lattice-work pattern over your flowers. Cut the ribbon into strips and lay them horizontally across the roses, then lay the other ribbon strips vertically across those.

4) Place on your table and wait for the Oohs and Aahs.

Tuesday, December 22, 2009

Last Minute Christmas Décor Tips


It’s almost the big day! Here are some last minute ideas for your Christmas decorating:

Tip #1: I always suggest having at least one dramatic statement. I think a great one for Christmas would be to get a small Christmas tree and put it right in the center of your dining table (similar to what we did in the picture above). And instead of covering it with ornaments I would use white orchids to decorate it.

Tip #2: Christmas lights are always fun to work with. I like using all white ones and using them in a non-traditional way. For example they could be your window or wall décor. You could string them up and down a window in very straight lines to make sure it doesn’t look messy

Tip #3: Around the holidays smells always bring us back to childhood. I like to mix cinnamon sticks, cloves, all spice, and nutmeg all together and put into a pot of boiling water so when my guests arrive the first thing that hits them is that comforting smell.

Tip #4: I love Christmas wreaths but not to hang on my door. They are great as the base of a vase or a large hurricane votive holder.

Do you have any tips to share? Let me know in the comments.

Monday, December 21, 2009

Holiday Inspiration Photo: Paper Christmas Decorations

It’s the week of Christmas. You’ve wrapped all the presents and now you have all this extra gift wrapping paper left. What to do? How about incorporating some of that paper into décor for your house? You’ll be surprised at how versatile gift wrapping paper can be (unless, of course, you chose that Sponge Bob as Santa gift wrapping paper—that may be more limited). A few pictures to inspire you:


Here, I used gift wrapping paper as a table runner. I also used the same paper to decorate plain votive candle holders. More on that below.


I wrapped pine tree patterned wrapping paper around votive candle holders and placed them on cake stands to form a faux-Christmas tree.


Another take on the paper as decoration for votive holders, but this time I cut the paper out for the holder to sit in.

Tomorrow, I’ll have some more last minute décor ideas for Christmas (in case you’re still trying to figure out how to make your home look extra special for the holidays).

Friday, December 18, 2009

Looking Back: Frames


One of my first clients was Christie's in New York City in 1983. I was fascinated to see old master paintings in these wonderful, traditional frames. Since then, this interest has evolved and become a part of my design aesthetic. The idea of frames, and using them in non-traditional or surprising ways, has become a signature design concept for me.


You may notice I’ve used the same frame in a few pictures in this post. I went to an antique shop one day and found these beautiful baroque frames just sitting there. They became a part of my collection, and have served as a background for many takes on the framing concept.  The frames are about 5ft by 6ft high.


How can you use frames in your own designs? Here are a few tips:

Tip #1: Find the right frame.  Depending on your design, you may want to use large, ornate frames or small, minimal frames. Don’t be afraid to mix and match. Look for circular and oval shaped frames in addition to the traditional rectangular and square shapes.

Tip #2: Don’t be afraid of 3-D. Take unusual objects and frame them. We’ve framed everything from flower arrangements to candles. You can take dolls and frame them in a child’s room or you can take fresh herbs and frame them in your kitchen. Look around at what you have and you’ll probably find  many things you can stick in a frame!

Tip #3: As with so many of the other design tips I’ve given—pick a theme. This technique can  produce a very eclectic look. What you don’t want to happen is to have it look messy or confusing. Choose one color or one type of object to frame to give it a consistent and purposeful look.

Do you have any tips on what to do with frames? If you have any great pictures where you’ve framed something unique, feel  free to share those too.

Monday, November 23, 2009

DIY Thanksgiving: Napkin Décor


If you’re tired of using plain white napkins every year for your special dinner, try adding a little color and surprise with this simple napkin decoration. You can keep it monochromatic like we did, or you can layer different complementary colors to add a rainbow to your table.

Materials:


  • White napkin (cloth or paper based on how casual or formal your dining table is)
  • Hot glue gun
  • Colored Paper
  • Scissors
  • Small colored poofs (These can be found at any local craft store)
  • Colored ribbon
Instructions:


1. Cut your colored paper into any shape you’d like. We used hearts here. Cut two pieces for each napkin you’ll be using (e.g. 16 pieces of paper for your table of 8). After you’ve cut all your shapes, take half of the pieces of paper (e.g. 8 of the 16) and set them aside. With the remaining pieces, take your colored poofs and hot glue them neatly on to the paper. We started by gluing the poofs along the outer border of the heart and worked our way inward. Set pieces aside to dry.


2. Fold your white napkins neatly into a rectangular shape. Take your colored ribbon and wrap each white napkin. Secure the ribbon by hot gluing the ends together behind the napkin. Take the pieces of paper you set aside and place them inside the ribbon of each napkin.

3. At your dining table, place your napkins down next to each plate and add the decorated paper (with the poofs) on top of the ribbon, a little offset, so you can see the other layer of paper beneath it. Finish off with silverware and you’re all set.

As always, please don’t forget to share pictures of your creations. Email them to my editor: Karell@prestonbailey.com, or post on your blog and leave the link in the comments.

Friday, October 16, 2009

Decorating for Fall

I went on the Today Show today to discuss affordable DIY options for decorating for fall. Check out the video below. If you'd like to learn how to make your own pieces, click here to visit the How-To's page of my site.

And if you have your own DIY tips, definitely let me know. I'd love to hear about them.

Tuesday, February 24, 2009

DIY - You can "Do it yourself"

I love designing table setting. Whether the event is large or small it is the one place where people can gather. I enjoy designing tables that are full of visual layers - the details in the napkins, the placemats, the candles, the tableware, and, of course, the tall centerpiece.

Apart from designing for my clients, one of my greatest joys is empowering people to do it themselves. I am always so honored when people come up to me and tell me that they recreated one of my designs for their event. Still, some opt not to create their own table setting because they fear that they do not have the skills or that these statements have to cost a fortune, and include the most expensive flowers, linen, and tableware. It just isn’t true.

In my new book, "Celebrations," I have a chapter dedicated to making simple to challenging table settings using only the most cost effective materials and natural elements. I hope that this chapter inspires all of you DIYers out there to go for it. Here is one of the table settings, the one I call the Wedding Bell:


The beauty of this table and what makes it cost effective is that most of the wonderful layers and details are done with paper.

To further inspire you to create your own table setting, I am going to provide on Monday, April 6th a complete how-to guide and resource manual for you to create the Wedding Bell. There will be a modest cost for the manual because I will only send out 1,000 copies. If you are interested and would like to reserve your copy, please email us at diy@prestonbailey.com with your name, address, email address and telephone number.

Forever Inspired,

Preston

Friday, February 13, 2009

My Country, My Inspiration, My Orchid

Inspiration can be a mysterious and fleeting thing with no clear source, and at other times the inspiration is crystal clear. After a recent trip to my hometown in Panama, I experienced the latter form of inspiration.

I was invited by Las Amigas de Malambo for a project that is near and dear to my heart, which is the Malambo Orphanage. I had the privilege of being honored with the keys to the city and was treated with great love. Amongst the many wonderful celebrations, I attended one of the most glamorous parties in the magical home in the sky, of the infamous architect Nacho Mallol, his lovely wife Sandra and their beautiful family. They hosted a party that was entertainment Panamanian style and was a thoroughly enjoyable event that would rival even the most lavish Hollywood parties.

Another highlight of my trip and the source of my latest inspiration was a visit to one of the largest orchid farms in the world, Hacienda Loma Linda, owned by Juan Arias and Juan Arias Jr. Experiencing this farm is like a visual feast for the eyes with a wide array of orchids blossoming in various hues and proportions. Immediately I was reminded of the splendor of my country and of the connection to nature that I always feel when I visit Panama.

To pay homage to my source of inspiration I created my own version of an orchid composed of wild moss, colorful leaves, and exotic candles. The beauty of this arrangement for a table is that at the end of an event each guest can take an orchid home with them. So not only is the orchid a decoration but it also serves as a wonderful gift; and that's the gift of inspiration that keeps on giving.

Friday, January 30, 2009

Valentine's Day


What better symbol for love is there than flowers? Juliet was aware of this when she compared her affection for Romeo to a "bud of love," that will blossom into a "beauteous flower." Centuries later and it's no surprise that flowers remain the standard gift on Valentine's Day.

But this year why not do something inspired, unique, and absolutely unforgettable for your loved one? The Valentine Bouquet is an arrangement with absolutely no flowers. The bouquet is designed with sweet decadent chocolate, ripe succulent fruit, and exotic nuts; wrapped at the base with a satin ribbon of radiant color. It's simple to make at home, cost-effective in these dire economic times (after all you can eat it too), plus it's a creative and original way to express your love.

The Valentine Bouquet is an arrangement that your loved one will greatly appreciate and never forget. I'm quite sure Juliet wishes she had thought of this idea for Romeo.

Friday, December 12, 2008

Paper Elegance


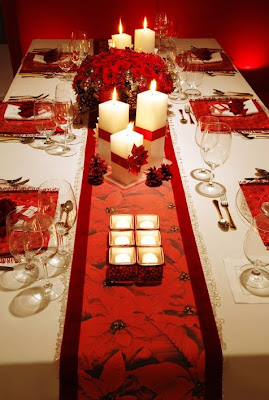
I love this! We created a beautiful elegant table all made from wrapping paper, ribbons, and small embellishments. You can do this so easily bust out your scissors and glue guns.


We glued ribbon along the edge of our favorite wrapping paper and add some beading to the ribbon to give it a nice finished look. You can see we made our placemats and table runner like this. Then we cut out images of poinsettias and put them on our candles with some ribbon as well. You don’t need tons and tons of money to have a beautiful table this year.

Related Posts with Thumbnails